Custom Presentation
Select the Custom radio button on the “Display Query Results” dialog if you want the results of the query to be presented in a custom manner. using an HTML template that is displayed for every row of data that the query returns.
Within the body of your HTML code, you can refer to the attributes being displayed by the query. The name of the attribute must be enclosed in curly brackets, for example, {Subject}.
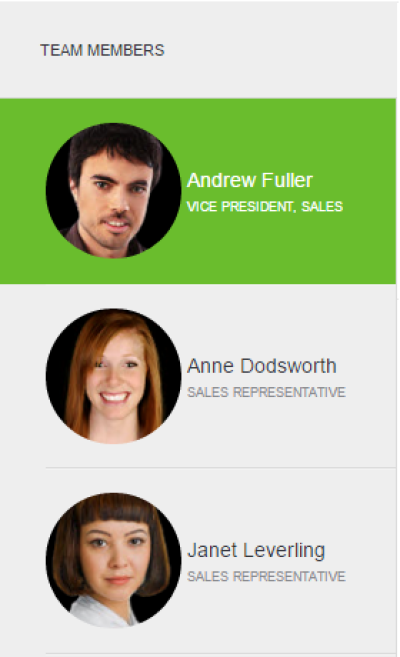
Below you will find an HTML fragment from the Sales Portal sample application that displays query results of an object that has FirstName, LastName, Title and Photo attributes.:
 <div class="nwd-employee">
   <div class="nwd-employee-wrapper">
      <div class="nwd-employee-list-image">
      {Photo}
      </div>
      <dl class="nwd-employee-list-details">
      <dt class="nwd-employee-name">{FirstName} {LastName} </dt>
      <dd class="nwd-employee-title">{Title}</dd></dl>
   </div>
 </div>
The result is shown on the picture below:
The following properties specific to the custom presentation of query results are available in the Properties window of the query:
Template body
In this area you can define an HTML code that will be used to display each record found by the query. You can either enter HTML directly or you can use the Custom Template Builder that allows building the template interactively and then automatically generates the corresponding HTML code. To use the Custom Template Builder, click on the “Build…” button. This is described in the following video tutorial:
This video tutorial explain how to work with queries using HTML and CSS to show retrieved records
An HTML template may contain embedded Javascript. Javascript lines start and end with the # symbol. A Javascript object called “data” is available to refer to the values of attributes, for example
data["Name"]
And here is an example of an HTML code with embedded Javascript from the CRM sample application:
# var cmId = "cm_" + data["ID"]; #
# var moreId = "cm_more_" + data["ID"]; #
# var lessId = "cm_less_" + data["ID"]; #
# var onclickMore = "AwareApp.editObject('Customer'," + data["ID"] +  ", '#" + cmId + "', 'Details'); $('#" + cmId + "').css ('display', 'block'); $('#" + lessId + "').css ('display', 'block'); $('#" + moreId + "').css ('display', 'none');" #
# var onclickLess="$('#" + cmId + "').css ('display', 'none'); $('#" + lessId + "').css ('display', 'none'); $('#" + moreId + "').css ('display', 'block');" #
        <div class="crm-customer">
            <div class="crm-customer-wrapper">
                   <div class="crm-customer-list-image">
                      {Photo}
                   </div>
                   <dl class="crm-customer-list-details">
                        <dt class="crm-customer-name">{FirstName} {LastName} </dt>
                        <dd class="crm-customer-email">{EmailAddress}</dd>
                        <dd class="crm-customer-nmb-contacts">{NmbContacts} contacts</dd>
                        <dd><a class="crm-link" id="#= moreId #" onclick="#= onclickMore #">More...</a></dd>
                        <dd><a class="crm-link" id="#= lessId #"    onclick="#= onclickLess #" style="display:none">Less...</a></dd>
                 </dl>
                  <div id="#= cmId #" class="crm-details-ph"></div>
            </div>
       </div>
Displaying special widgets
It is also possible to embed the following widgets into the HTML:
- Rating widget
- Barcode
- QR Code
- “Chip” widget
A rating widget can be embedded by using the following expression inside the HTML:
{AttributeNameOfTheNumberType,rating}
wwhere you specify the attribute that contains the rating value followed by comma and the word “rating”. An example of this is in the Issue Resolution sample application (All Staff query).
Similarly, a QR Code can be embedded using this expression:
{AttributeName,rcode}
Properties of the QR Code can be specified if you embed the QR Code expression in a special <div> element like so:
<div class="aw-qrcode-settings" border-width="2px" border-color="#ff0000" color=#00ff00" padding="15px">
{AttributeName,qrcode}
</div>
The following QR Code properties can be used:
- bgnd_color
- border_color
- border-width
- color
- encoding
- error_correction
- overlay_url
- overlay_height
- overlay_width
- overlay_type
- padding
- size
To embed barcodes use the following expression:
{AttributeName,barcode}
To define properties, embed in the following <div>:
<div class="aw-barcode-settings" type="code39" width="280" height="100">
{AttributeName,barcode}
</div>
The following properties can be specified in the <div>:
- type
- width
- height
- bgnd_color
- border_color
- border_width
- color
- text_color
- text_margin
- show_checksum
- show_text
And to embed a “chip” widget use the following expression:
     <div class="aw-chip-settings" fill_mode="outline" icon="check">
       {AttrName,chip}
     </div>
An example of an embedded barcode and chip widgets is in the Sales Portal sample application (query “Products”)
Layout
The radio buttons in this section allow specifying how the records in the final display will be arranged – this is also explained in detail at the end of video tutorial.
Widget Settings
Custom presentation of query results can be displayed using two widgets - List View and Scroll View. The List View displays records in any manner that you specify, whereas the Scroll View always displays a single row of items with a special pager that is often used in mobile applications (this is like a gallery view of items).
For the List View widget you can specify whether the custom query will have a paging bar and display certain number of items per page. Alternatively, you can select “Unlimited” as the number of items to display. In this case the widget will support unlimited scrolling without pagination asking the server when necessary to download the next batch of records. If overall number of records is not too big you can tick the “Load all available records” checkbox. In this case all records will be downloaded at once.
For the Scroll View widget you can specify how many records it will show at a time as well as whether the pager will be available.
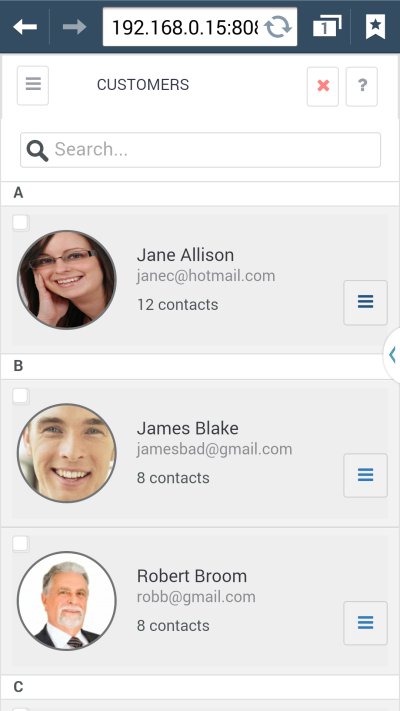
All of these settings can be especially useful for mobile phones. The picture below shows an example of a custom query used on a phone.
Operations with items
All item operations are assigned to a button (you can control the icon displayed for this button). When the user taps this button a popup menu with operations is displayed.
Filters
See this section: Query Filters